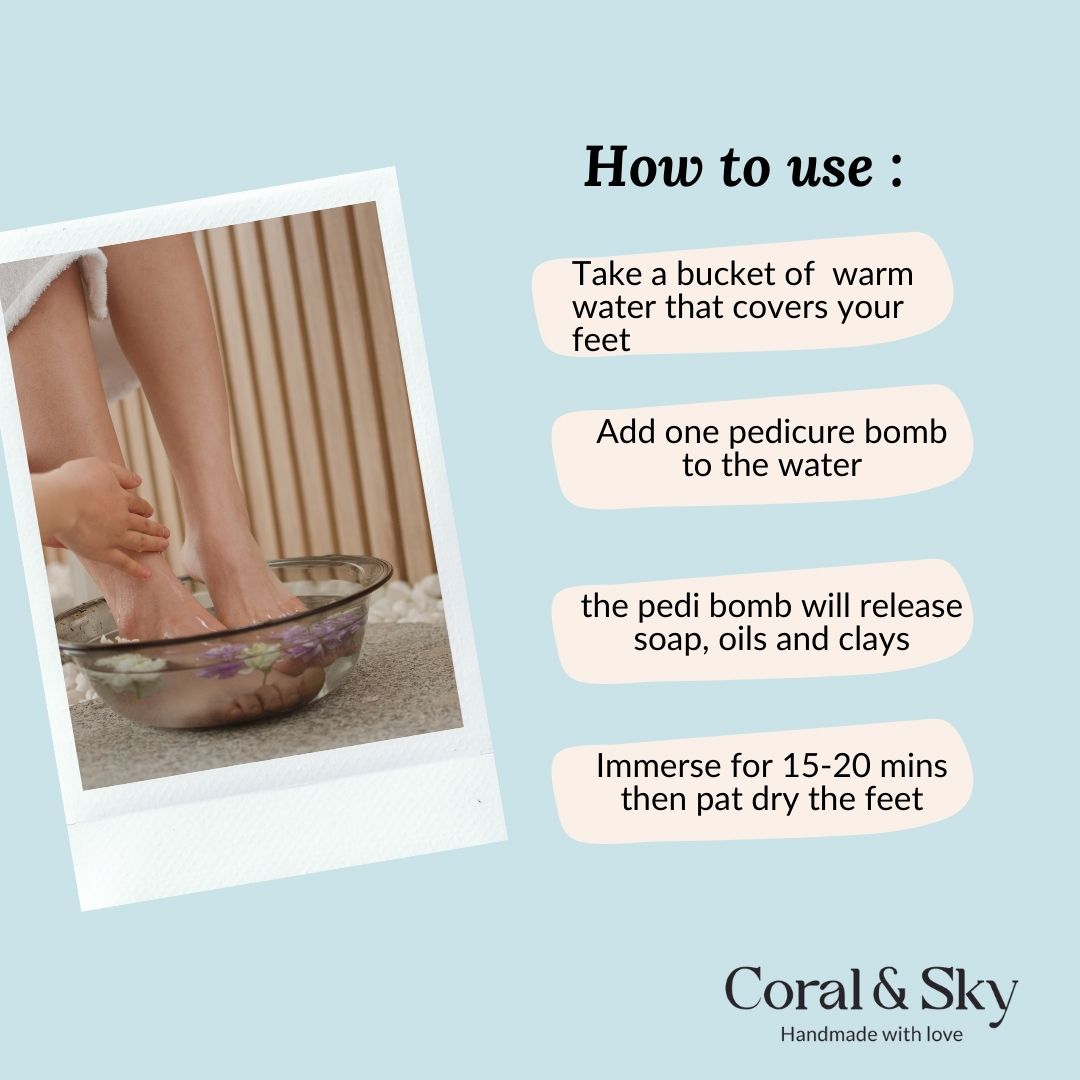

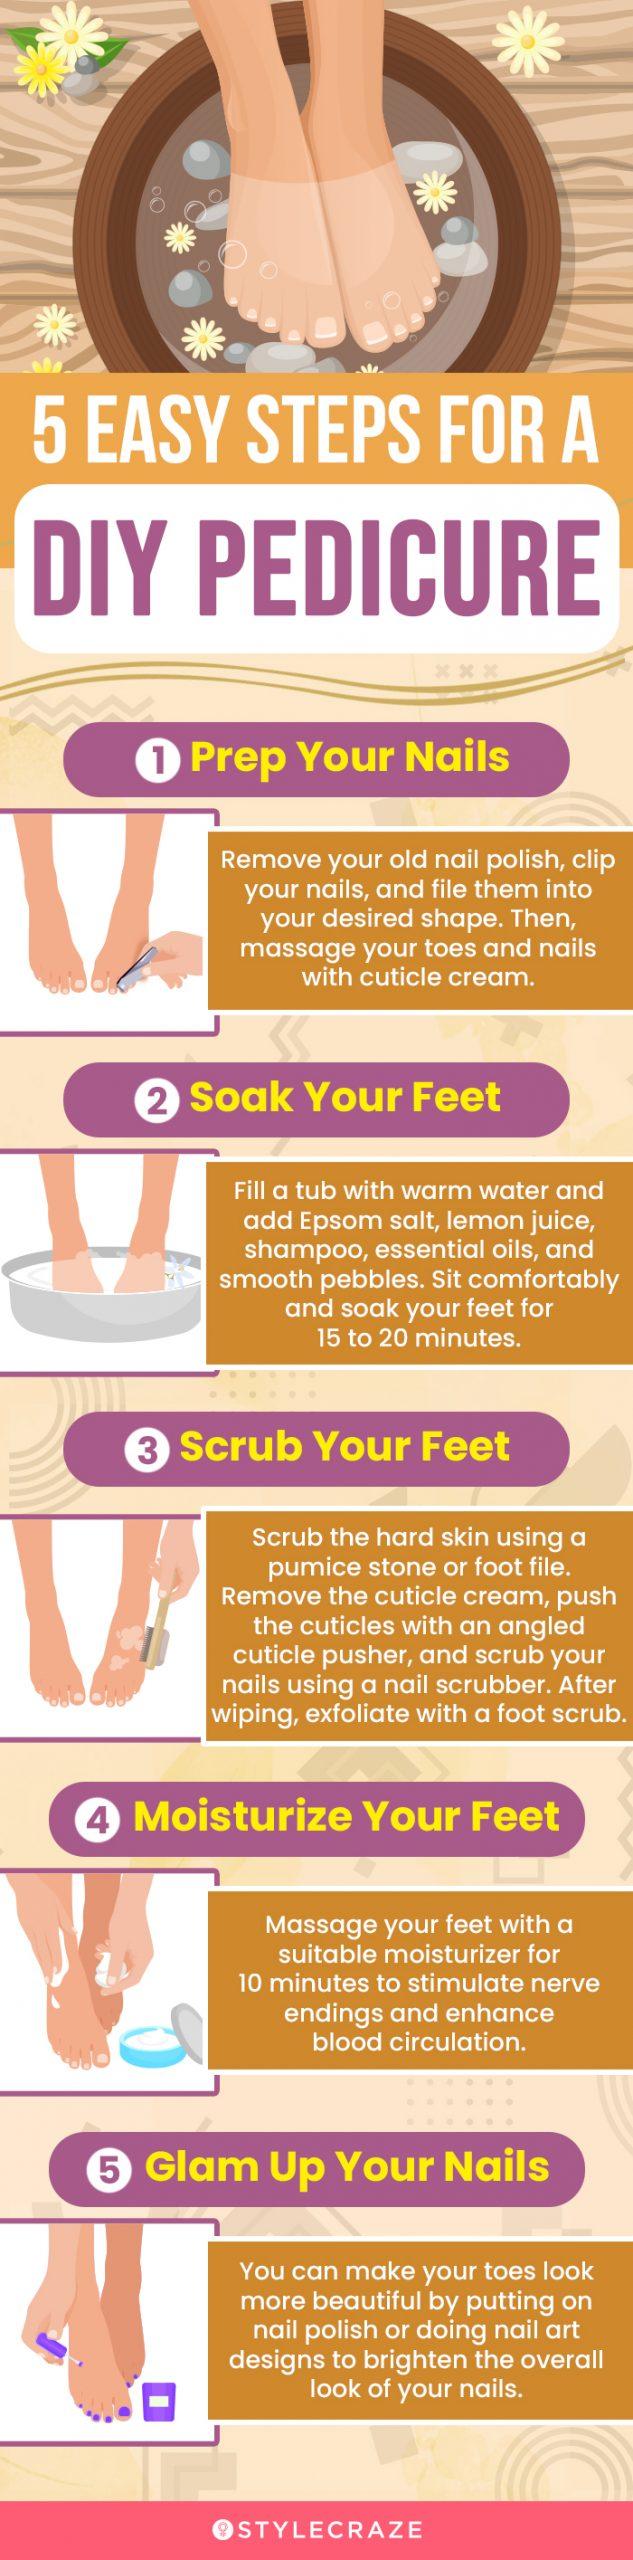
To perform a pedicure at home, fill a basin with warm water and add a gentle foot soak. Relax your feet in the water for 10-15 minutes to soften the skin and soothe tired muscles.
This simple DIY pedicure treatment can help maintain healthy feet and provide a relaxing self-care experience. By incorporating this easy step into your routine, you can achieve soft, smooth feet without the need for a salon visit. Not only is this cost-effective, but it also allows you to pamper yourself in the comfort of your own home.
So, let’s dive into the world of at-home pedicures and give your feet the care they deserve.

Credit: www.healthline.com
Introduction To Home Pedicures
Looking for a way to pamper your feet without leaving the comfort of your home? A home pedicure is the perfect solution. Not only is it convenient, but it also allows you to personalize the experience to suit your preferences. By following a few simple steps, you can achieve salon-worthy results and enjoy the benefits of a professional pedicure without the expense.
Benefits Of A Pedicure At Home
Performing a pedicure at home offers various advantages:
- Cost-effective
- Convenient and time-saving
- Customizable to personal preferences
- Relaxing and comfortable environment
- No need to travel to a salon
Basic Requirements For A Home Pedicure
To conduct a pedicure at home, you will need the following basic supplies:
- Foot soak or basin
- Nail clippers
- Nail file
- Exfoliating scrub
- Moisturizing lotion
- Nail polish and topcoat (optional)
Epsom Salt: The Classic Choice
Epsom salt has been a staple in at-home pedicures for decades, and for good reason. Its natural healing properties and exfoliating abilities make it the classic choice for a relaxing and rejuvenating foot soak. When it comes to pampering your feet, Epsom salt is the go-to ingredient for a DIY pedicure that rivals the spa experience.
Why Epsom Salt Works Wonders
Epsom salt is rich in magnesium sulfate, which helps to soothe tired, achy feet and reduce inflammation. The exfoliating properties of Epsom salt also help to slough off dead skin cells, leaving your feet soft and smooth. Additionally, it can aid in treating fungal infections and neutralizing foot odor, making it a versatile and effective choice for at-home pedicures.
How To Use Epsom Salt In Your Pedicure
Adding Epsom salt to your at-home pedicure routine is simple and straightforward. Start by filling a basin with warm water and adding a half cup of Epsom salt. Let your feet soak for 15-20 minutes to allow the salt to work its magic. After soaking, gently exfoliate your feet with a pumice stone to remove any remaining dead skin. Finish off by rinsing your feet with clean water and patting them dry with a soft towel.
Essential Oils: A Scented Boost
Essential oils can be a great addition to your at-home pedicure routine. Simply add a few drops of your favorite oil to a basin of warm water and soak your feet to enjoy the scent and potential benefits.
Looking for a way to enhance your at-home pedicure experience? Essential oils are the perfect addition! Not only do they smell great, but they also offer a range of benefits for your skin and overall well-being. In this post, we’ll explore some of the most popular essential oils for pedicures and how to combine them for maximum effect.Popular Essential Oils For Pedicures
When it comes to choosing essential oils for your pedicure, there are a variety of options to choose from. Here are some of the most popular essential oils and their benefits:| Essential Oil | Benefits |
|---|---|
| Lavender | Calms and soothes the skin, promotes relaxation |
| Peppermint | Cools and refreshes the skin, relieves soreness and fatigue |
| Lemon | Brightens and tones the skin, has a fresh, clean scent |
| Tea Tree | Antibacterial and antifungal properties, helps prevent infections |
Combining Oils For Maximum Effect
While each essential oil offers its own unique benefits, combining them can create an even more powerful effect. Here are some popular oil combinations and their benefits:- Lavender and Peppermint: Soothes sore and tired feet while promoting relaxation
- Lemon and Tea Tree: Brightens and tones the skin while preventing infections
- Peppermint and Tea Tree: Cools and refreshes the skin while fighting bacteria and fungi
Credit: www.stylecraze.com
Baking Soda: For Soft, Smooth Feet
Discover the secret to achieving soft, smooth feet right at home with the power of Baking Soda.
The Benefits Of Baking Soda
Baking Soda is a gentle exfoliant that helps remove dead skin cells.
It neutralizes odors and helps to soften calluses on the feet.
Guidelines For Baking Soda Use
- Mix 2-3 tablespoons of Baking Soda with warm water in a basin.
- Soak your feet for 15-20 minutes to allow the Baking Soda to work its magic.
- Gently scrub your feet with a pumice stone to enhance the exfoliating effect.
- Rinse your feet with clean water and pat dry with a soft towel.
Apple Cider Vinegar: For Healthy Feet
Apple Cider Vinegar (ACV) offers numerous benefits for maintaining healthy feet. Its natural healing properties can help in treating various foot issues and keeping your feet soft and smooth.
Healing Properties Of Apple Cider Vinegar
ACV is known for its antibacterial and antifungal properties that can help in preventing infections and odors. The acetic acid in ACV helps to exfoliate dead skin cells, leaving your feet refreshed and rejuvenated.
Preparing Your Apple Cider Vinegar Soak
- Mix 1 part ACV with 2 parts warm water in a basin.
- Add a few drops of essential oils for a relaxing aroma.
- Soak your feet for 15-20 minutes to enjoy the benefits.
Apple Cider Vinegar is a simple and effective solution for maintaining healthy and beautiful feet at home.
Credit: www.ouroilyhouse.com
Lemon And Honey: Natural Antiseptic Duo
Revitalize your at-home pedicure by adding lemon and honey to water, a natural antiseptic duo that will leave your feet feeling refreshed and rejuvenated. This simple yet effective combination helps to cleanse and soften your skin while providing antibacterial benefits.
Why Lemon And Honey?
Lemon and honey are natural antiseptics that work wonders for our skin. They are packed with several health benefits, including antibacterial and anti-inflammatory properties. Using a mixture of lemon and honey in your pedicure routine can help to soothe and heal your feet, leaving them looking and feeling refreshed.Creating The Perfect Lemon And Honey Soak
To create the perfect lemon and honey soak for your pedicure, you will need:- A large bowl of warm water
- 1/4 cup of fresh lemon juice
- 1/4 cup of raw honey
Customizing Your Pedicure Experience
Enhance your at-home pedicure by adding essential oils or Epsom salt to the water, creating a spa-like experience. Customize your pedicure with a foot soak using warm water to relax and soften your feet before continuing with the rest of your pampering routine.
Mix And Match Additives
Enhance your at-home pedicure experience by experimenting with different additives. Adding ingredients to your foot soak can provide various benefits and cater to your specific needs. Here are a few options to consider:
- Epsom Salt: Soothes tired feet and helps relieve muscle aches.
- Essential Oils: Add a few drops of your favorite essential oil for a relaxing or invigorating aroma.
- Lemon Juice: Natural acidity can help exfoliate dead skin cells.
- Honey: Moisturizes and softens the skin.
By mixing and matching these additives, you can create a personalized foot soak that caters to your preferences and addresses specific foot concerns.
Finding What Works Best For You
When customizing your pedicure experience, it’s important to find what works best for you. Experiment with different foot soak recipes, nail care products, and tools to discover your ideal combination. Keep in mind the following tips:
- Know Your Skin Type: Different skin types require different levels of exfoliation and moisture. Adjust your pedicure routine accordingly.
- Consider Nail Health: Choose nail care products that strengthen and nourish your nails, preventing breakage and promoting growth.
- Invest in Quality Tools: High-quality tools, such as a pumice stone or foot file, can make a significant difference in the effectiveness of your pedicure.
- Listen to Your Feet: Pay attention to any discomfort or issues your feet may have. Adjust your routine accordingly to address those concerns.
Remember, everyone’s preferences and needs are unique, so take the time to find the combination of products and techniques that work best for you.
Aftercare: Maximizing The Benefits
Once you have finished your DIY pedicure using a put in water method, it’s important to follow proper aftercare to maximize the benefits and keep your feet looking and feeling their best. After all, you’ve put in the effort to pamper your feet, so let’s make sure the results last!
Moisturizing After Your Pedicure
One crucial step in aftercare is moisturizing your feet. After you’ve completed your pedicure, apply a rich and nourishing foot cream or lotion to keep your skin hydrated and soft. Massage the moisturizer into your feet, focusing on dry areas such as your heels and the balls of your feet. This will help prevent dryness, cracking, and calluses, leaving your feet feeling smooth and supple.
Tips For Maintaining Soft Feet
- Regularly exfoliate your feet using a gentle scrub or foot file to remove dead skin cells and keep your feet looking fresh.
- Wear comfortable shoes that provide proper support and cushioning to prevent foot pain and discomfort.
- Avoid walking barefoot in public areas to reduce the risk of infections and keep your feet clean and healthy.
- Trim your toenails regularly to maintain their shape and prevent ingrown nails.
- Consider using a foot soak or bath once a week to relax your feet and keep them rejuvenated.
- Protect your feet from extreme temperatures by wearing appropriate footwear in hot and cold weather conditions.
Frequently Asked Questions
How Can I Do A Pedicure At Home?
To do a pedicure at home, start by soaking your feet in warm water for about 10-15 minutes. Then, trim and shape your nails, push back your cuticles, and exfoliate your feet. Next, apply a moisturizer and massage it into your skin.
Finally, paint your nails with your favorite nail polish color.
What Are The Benefits Of Doing A Pedicure At Home?
Doing a pedicure at home has several benefits. It saves you time and money compared to going to a salon. It allows you to relax in the comfort of your own home and customize your pedicure routine. It also helps improve the health and appearance of your feet, leaving them soft, smooth, and beautiful.
What Items Do I Need For A Diy Pedicure At Home?
For a DIY pedicure at home, you will need a basin or tub to soak your feet, warm water, a towel, nail clippers, a nail file, cuticle pusher, foot scrub or pumice stone, foot cream or moisturizer, and your favorite nail polish.
You can also add essential oils or bath salts for a more luxurious experience.
How Often Should I Do A Pedicure At Home?
The frequency of doing a pedicure at home depends on individual preferences and needs. Generally, it is recommended to do a pedicure every 2-4 weeks to maintain healthy and well-groomed feet. However, you can adjust the frequency based on your nail and skin condition, lifestyle, and personal preferences.
Conclusion
Doing a pedicure at home is a convenient and cost-effective way to pamper yourself. By using simple ingredients like water, you can achieve professional results without leaving the house. With the right tools and techniques, you can enjoy a relaxing and rejuvenating pedicure experience in the comfort of your own home.